E-LEARNING
MANUAL FOR STUDENTS
Ø ACCESSING THE E-LEARNING PLATFORM
Ø SUBMIT ASSIGNEMTNS
RESPONSES TO COURSE LECTURERS
ACCESSING THE E-LEARNING PLATFORM
i.
After login into your home page as shown
in Figure 1 below, click the E-Learning link
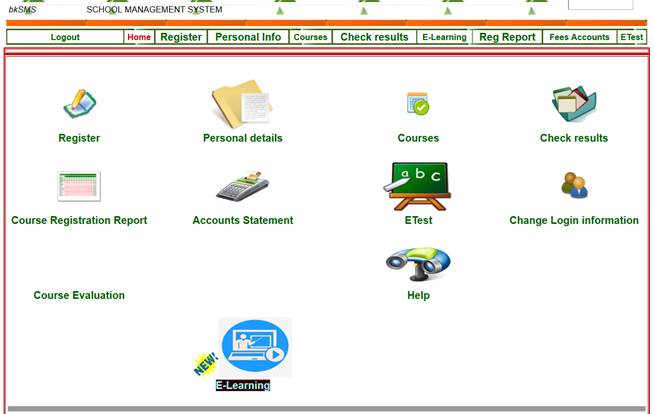
Figure
1
ii.
The interface in Figure 2 is
displayed after clicking the E-Learning link in Figure 1.
iii.
Select the appropriate academic year,
Year, Semester and Group. By default, the current Academic Year and
current Semester is selected ass well as all
groups (regular groups (A, B,…) and Weekend group
(W)). Click the OK button

Figure 2
iv.
The sample interface in Figure 3 is
displayed after performing the task in 1iii-Figure 2. This page displays
registered courses for the semester when E-learning materials are uploaded by
the respective course lecturers. (Note: A registered course is not shown
among the list if no e-learning material is uploaded the respective lecturer.)
v.
The page displays the course code,
course name, Program, Year, and name of course tutor for each of the
courses. It also displays the LEARNING MATERIAL, ASSIGNMENT AND FORUM
fields which links you to contents of the e-Learning platform. The E-learning
materials are available under the LEARNING MATERIAL field. Assignments
requesting your responses and submissions are available under ASSIGNMENT
field. The FORUM field allows you to access the discussion forum to ask
questions and take part in discussions relating the given course.
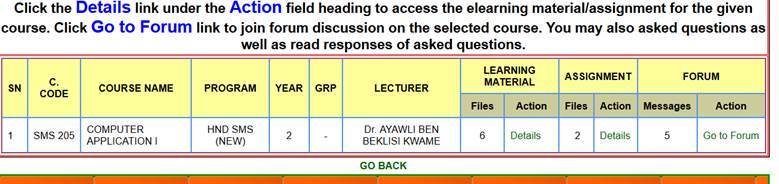
Figure 3
E-LEARNING
MATERIALS ACCESS
i.
Under LEARNING MATERIAL field in the table in Figure
3, the number of e-learning materials uploaded by the course tutor for you
is indicated under Files (Eg. 3 as indicated
in Figure 3).
ii.
To get details and access these files,
click the Details link under Action of the LEARNING MATERIAL
field for the respective course.
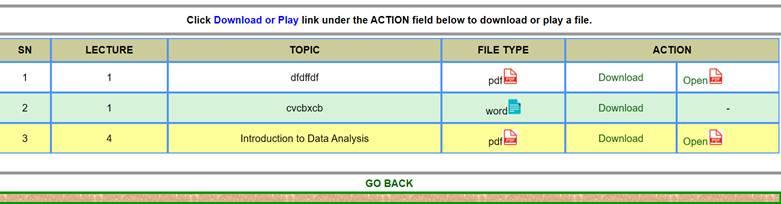
iii.
The page in Figure 4 is displayed
after clicking the Details link.
Figure
4
iv.
From the listed files, click the Download
link under the ACTION field to download a given file OR click Open (if
enabled) to directly open the file in the browser.
E-ASSIGNEMENTS
ACCESS
i.
The number of assignments uploaded for you
to respond to is indicated under Files of the ASSIGNMENT field. To view
details and access these assignments, click the Details link under
Action of the ASSISGNEMT field as shown in Figure 3.
ii.
The following sample page in Figure 5
is displayed indicating the list of the assignments. To access the assignment,
click the Download link or Open (if enabled) to download
or view the content of the assignment file.
SUBMIT
ASSIGNEMTNS RESPONSES TO COURSE LECTURERS
i.
After responding to each of the
assignments. Prepare your file in pdf or word document file formats and upload
by clicking the Click to upload link under the Submit Response
field as shown in Figure 5. If the files are more than one for an
assignment, put all together in a zip and upload. Zip file types different from
pdf or word document files before uploading.
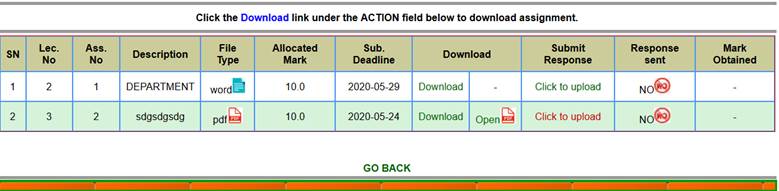
Figure 5
ii.
After clicking the Click to upload file
link, the page in Figure 6 below is displayed. Click the Browse
button to browse and select the file for upload.
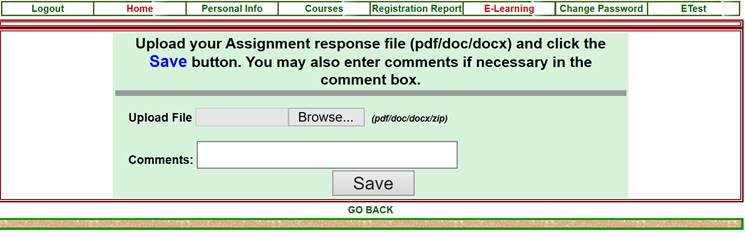
Figure 6
iii.
Enter any comments for the assignment
where necessary in the Comments text box.
iv.
Click the SAVE button to complete
the file upload.
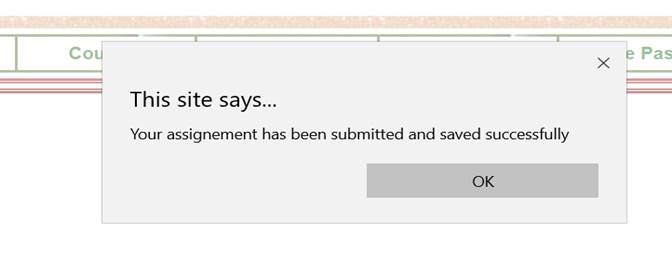
v.
When the upload is successful, the message
as shown in Figure 7 is displayed. If this message is not displayed, it
means the upload is not successful and you have to try again by paying heed to
the error message that appears.
Figure
7
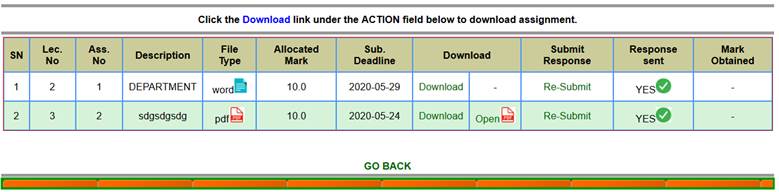
vi.
When the submission is successful, the
link under Submit Response is replaced by the text “Re-Submit”
and YES is shown in the Response sent field for the given
assignment as represented in Figure 8 provided the submission deadline
is not due. You can re-submit your response in case you made a mistake in the
previous submission until the submission deadline elapses. Re-submitted
responses replaces the previous uploaded response for the given assignment. If
the given submission deadline elapses, Submitted
is displayed when you uploaded your assignment response. Submission Closed is
however displayed if the submission deadline is not met and your assignment
response is not uploaded.
NOTE:
For each assignment, only one file can be uploaded (pdf, word or zip)
Figure
8
FORUM
DISCUSSION
Forum discussion is provided to enable you to discuss
or ask questions relating to the topic and course concern. The number of
discussion messages for the respective courses are indicated under Messages
of the FORUM field in Figure 3. Go to the forum by clicking on the Go
to Forum link under Action of the FORUM (field Figure 9).

Figure
9
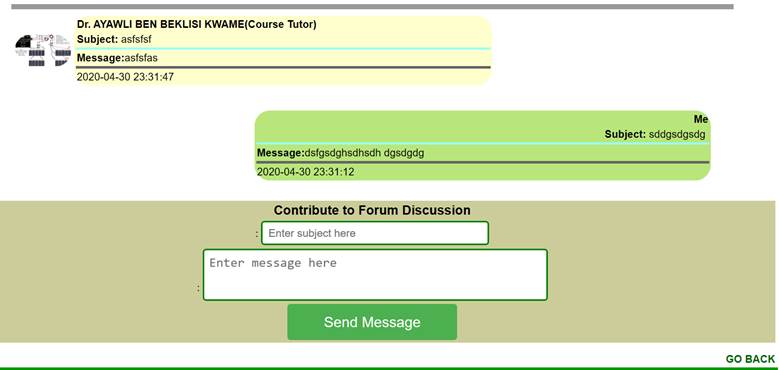
i.
A sample page (Figure 10) that
allows you to view and read messages at the discussion forum and text boxes to
allow you to contribute to discussions is displayed. You can view and read
messages sent by members of your class including the course tutor.
ii.
You can contribute to the discussion by entering
the subject of your message in the first text box and the actual message in the
second text box. Click Send Message to send the message to the forum.
Note: To go back to the
previous page, it is recommended to click the GO BACK link if available instead
of the Go Back button on the address bar of your browser.
Figure
10